Perimeter Drain Systems: Essential Guide to Protecting Your Home from Water Damage

Perimeter Drain Systems: Essential Guide to Protecting Your Home from Water Damage

By Walsh Crawl Space | Published on November 7, 2024


Perimeter drain systems play a critical role in preventing water intrusion and managing moisture around your home’s foundation. This guide explains what a perimeter drain system is, how it works, and why it’s essential for any property owner concerned about foundation and water-related damage.
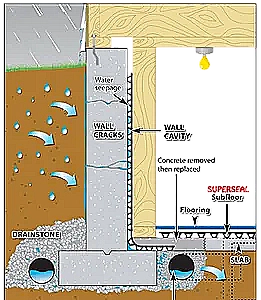
What is a Perimeter Drain System?

A perimeter drain system, also known as a French drain or foundation drain, is designed to channel groundwater away from your home’s foundation. By redirecting water away from vulnerable areas, these systems protect basements and crawl spaces from water infiltration, which can lead to structural damage and mold growth. A well-installed perimeter drain system collects water around the perimeter of the building and directs it to a sump pump or a safe drainage location.

Why Your Home Needs a Perimeter Drain System

Without proper drainage, water can accumulate around the foundation, leading to cracks, leaks, and compromised structural integrity. Perimeter drains help mitigate these risks by keeping water away from the foundation walls. They are particularly crucial for homes built in areas with high water tables or heavy rainfall. In addition to structural benefits, perimeter drain systems can help maintain a dry, healthy environment within crawl spaces and basements, reducing the risk of mold, mildew, and pests.

How Does a Perimeter Drain System Work?

Perimeter drain systems are typically installed at the base of the foundation. A trench is dug around the foundation walls, where a perforated drain pipe is placed and surrounded by gravel. This setup allows water to seep into the pipe through perforations, directing it away from the foundation. Some systems lead to a sump pump basin, where the water is then pumped away from the home. The gravel acts as a filter, preventing soil from clogging the pipe while allowing water to flow freely.

1. Trench Excavation

In the first step, professionals dig a trench around the foundation. The depth of this trench is carefully calculated based on the home’s foundation level and the local water table.

2. Laying the Drain Pipe

A perforated pipe is then laid in the trench, sloping slightly to ensure water flows in the right direction. The pipe is positioned to collect groundwater efficiently while avoiding areas that could lead to clogging.

3. Backfilling with Gravel

After placing the pipe, contractors fill the trench with gravel to support drainage while filtering out soil particles. The gravel layer is essential to maintain clear pathways for water to enter the drainage system.

4. Connecting to a Sump Pump

In many installations, perimeter drain systems are connected to a sump pump, which actively moves water away from the home’s foundation. The sump pump acts as a secondary line of defense against water intrusion.
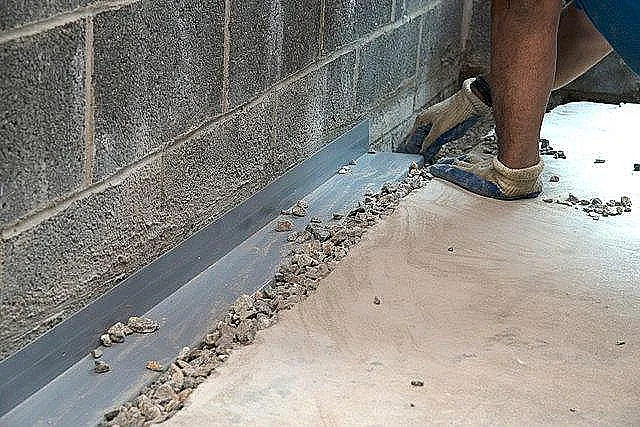
Maintaining a perimeter drain system

Walsh Crawl Space: With proper perimeter drain installation and maintenance services, Walsh Crawl Space helps keep your foundation safe from water damage. Contact us for a professional assessment today.

Key Benefits of Perimeter Drain Systems

Frequently Asked Questions About Perimeter Drain Systems

How often should I check my perimeter drain system?

It’s recommended to inspect your perimeter drain system at least once a year, especially before the rainy season, to ensure it's functioning properly and to clear any clogs or blockages.

Can a perimeter drain system prevent basement flooding?

Yes, a properly installed perimeter drain system is effective in preventing basement flooding by redirecting groundwater away from your home’s foundation.

Is a perimeter drain system suitable for all homes?

Most homes benefit from perimeter drains, especially if they have basements or are located in areas prone to heavy rainfall or high water tables. However, installation should be customized based on the property’s specific needs.

Schedule Your Perimeter Drain Installation with Walsh Crawl Space
Facebook Instagram

The Importance of Crawl Space Door Insulation and Sealing

The Importance of Crawl Space Door Insulation and Sealing

By Walsh Crawlspace


Insulating and sealing your crawl space door is essential for controlling moisture, enhancing energy efficiency, and protecting your home’s foundation. This article explains how insulation and sealing work, their benefits, and whether you should take a DIY approach or hire a professional.

Why Insulating and Sealing Crawl Space Doors Matters

Sealing and insulating your crawl space door prevents cold drafts and moisture from entering, which can affect the temperature and humidity of your home. Unsealed doors allow outside air and moisture to seep in, increasing the risk of mold growth, structural damage, and pest infestation. Effective insulation helps to keep the crawl space at a stable temperature, preventing extreme heat or cold from impacting your home’s comfort and energy costs.

Adding insulation to your crawl space door is especially valuable in homes with encapsulated crawl spaces, where maintaining an airtight seal helps prevent moisture and improve indoor air quality. Without proper sealing and insulation, energy efficiency can decrease, and your HVAC system may work harder to maintain comfortable indoor temperatures.

DIY vs. Professional Crawl Space Door Sealing

Homeowners often wonder if they should handle crawl space door sealing themselves or hire a professional. While sealing the door with weatherstripping and installing foam board insulation can be managed as a DIY project, the precision and expertise of a professional can ensure a long-lasting, effective seal. Professional installers are skilled in applying high-quality materials, such as closed-cell spray foam or thermal barriers, that provide maximum insulation and protection.

For those with experience in home improvement, DIY may be a viable option, but keep in mind that any gaps or incorrect applications can lead to energy loss and pest entry. A professional installation, while more expensive upfront, may offer better peace of mind and savings in the long term.

Technology and Materials Used in Crawl Space Door Insulation

Modern crawl space insulation utilizes advanced materials to provide effective temperature and moisture control. Closed-cell spray foam, for example, is one of the most durable and insulating materials available, offering superior resistance to moisture and air infiltration. Foam board insulation is another popular choice, providing thermal resistance and helping to regulate temperature.

These materials are designed to withstand the conditions of a crawl space environment, making them essential for a lasting solution. The technology behind these materials continues to evolve, providing more efficient ways to insulate and seal, keeping your crawl space dry, and your home well-protected.

FAQs About Crawl Space Door Insulation and Sealing

Professional crawl space door insulation

Our Expert Process: At Walsh Crawl Space, we offer high-quality crawl space door insulation and sealing services, ensuring your home remains energy-efficient and protected from moisture.

Get a Free Crawl Space Insulation Consultation
Facebook Instagram
The Necessity of Crawl Space Doors: How and Why They Are Installed

The Necessity of Crawl Space Doors: How and Why They Are Installed

By Walsh Crawlspace


Crawl space doors are essential for protecting your home’s foundation, ensuring proper ventilation, and preventing unwanted pests. In this blog, we'll explain why these doors matter, how they're installed, and why you should prioritize them for your home.

Why Crawl Space Doors Are Essential

Crawl space doors serve as a critical barrier between your home’s foundation and the outdoor elements. They not only protect the crawl space from moisture, pests, and debris but also allow for necessary ventilation. This ensures that the space remains dry, free of mold, and structurally sound. Without a secure door, moisture can seep in, leading to wood rot, foundation cracks, and increased humidity in the home.

Properly installed crawl space doors help to regulate airflow, preventing the buildup of moisture and ensuring the space can breathe while keeping unwanted intrusions out. They play a significant role in maintaining your home’s overall health, particularly in climates prone to humidity and seasonal rain. Additionally, these doors make maintenance access easier, allowing homeowners and professionals to address any issues without major hassle.

How Crawl Space Doors Are Installed

The installation of crawl space doors is a relatively straightforward process but requires precision to ensure they fit securely and function properly. First, the existing opening is measured to determine the correct door size. Next, a durable, weather-resistant material is selected—often metal or heavy-duty plastic—to ensure longevity and protection from the elements. The door is then mounted with proper sealing to prevent air and water leaks.

Many homeowners opt to include vented doors to aid in air circulation, which is particularly important in humid regions. However, if your crawl space is encapsulated, a solid door with a tight seal is recommended to maintain the closed environment. Installing crawl space doors can usually be done by a professional within a few hours, ensuring your home is protected from external risks.

Why Proper Installation Matters

Installing a crawl space door might seem like a minor upgrade, but it is a crucial step in protecting your home’s foundation and interior. Poor installation can lead to gaps that allow water, pests, and humidity to enter, undermining the purpose of the door. Sealing the door properly is essential, as it prevents drafts and the infiltration of unwanted elements, making your home more energy-efficient as well.

If your crawl space door is damaged or deteriorating, replacing it can save you from future structural issues. A well-installed crawl space door offers peace of mind, knowing that your home is shielded from moisture, mold, and potential pest infestations. It’s also a low-cost solution that can prevent more expensive repairs in the long term.

FAQs About Crawl Space Doors

Crawl space door protecting foundation

Our Expert Process: At Walsh Crawl Space, we ensure your crawl space doors are installed with precision and care, providing long-term protection for your home.

Schedule Your Free Crawl Space Inspection Today
Facebook Instagram
The Ultimate Guide to Vapor Barrier Installation: Protect Your Home

The Ultimate Guide to Vapor Barrier Installation: Protect Your Home

By Walsh Crawl Space | Published on October 22, 2024


Vapor barrier installation is essential to protecting your home’s crawlspace from moisture damage, mold, and pests. In this guide, we’ll explain the importance of vapor barriers, how they work, and why professional installation is key to maintaining a safe and dry crawlspace. Learn why Walsh Crawl Space is your trusted partner for vapor barrier installation.

What is a Vapor Barrier?

A vapor barrier is a thick plastic sheet installed on the floors and sometimes walls of your crawlspace. Its primary function is to prevent moisture from the ground from seeping into your home. Without it, moisture can lead to serious problems such as mold growth, wood rot, and pest infestations. Installing a vapor barrier helps keep your crawlspace dry, improving air quality and protecting the structural integrity of your home.

Why Install a Vapor Barrier?

Homes without a vapor barrier in the crawlspace often experience moisture problems that can lead to various costly damages. Moisture creates the perfect environment for mold and mildew, which affects air quality and can lead to health problems for your family. Excess moisture also attracts pests like termites and can cause wood rot in the structural beams of your home. Installing a vapor barrier reduces these risks and can also make your home more energy efficient by controlling humidity levels.

The Vapor Barrier Installation Process

Walsh Crawl Space follows a meticulous process to ensure the vapor barrier is installed properly for maximum effectiveness:

  1. Inspection and Cleaning: We begin by inspecting the crawlspace for debris, old insulation, and any signs of damage. If we detect mold or mildew, we treat it before starting the installation.
  2. Sealing Vents and Openings: All vents and gaps are sealed using foam insulation or boards to keep moisture and pests out.
  3. Installing the Vapor Barrier: A durable vapor barrier is laid across the entire crawlspace floor and sometimes along the walls. The seams are overlapped and sealed tightly to prevent any moisture from passing through.
  4. Encapsulation of Columns and Piers: We wrap columns and piers to ensure there are no unprotected areas that could allow moisture to seep in.
  5. Final Sealing: Once the barrier is in place, we perform a final check to ensure all edges and seams are sealed properly, offering your crawlspace long-lasting protection.

Professional Installation vs. DIY

While it may be tempting to install a vapor barrier on your own, professional installation is highly recommended. Improper installation can result in incomplete coverage, leaving your crawlspace vulnerable to moisture problems. Our team at Walsh Crawl Space ensures that every aspect of the vapor barrier installation is done correctly, providing you with peace of mind and long-term protection for your home.

Maintaining Your Crawlspace After Vapor Barrier Installation

After your vapor barrier has been installed, it’s important to keep up with regular maintenance to ensure its effectiveness. Here are a few tips:

Professionally installed vapor barrier

Our Expert Process: At Walsh Crawl Space, we use high-quality materials and expert techniques to ensure your crawlspace stays dry and protected. Contact us today for a free consultation and learn how we can help safeguard your home from moisture damage.

Schedule Your Free Crawlspace Inspection Today
Facebook Instagram
Mold Remediation: The Essential Guide to What It Is and How It Works

Mold Remediation: The Essential Guide to What It Is and How It Works

By Walsh Crawl Space | Published on October 16, 2024


Mold remediation is essential for anyone looking to address mold issues and maintain a healthy indoor environment. This guide covers the general steps involved in the mold remediation process, what mold remediation entails, and why it’s crucial to handle mold properly to protect your health and property.

What is Mold Remediation?

Mold remediation goes beyond simply removing visible mold. It’s a comprehensive process that involves identifying the source of mold, isolating the contaminated area, and addressing moisture to prevent future growth. Mold remediation is important because mold can cause structural damage to buildings and health issues for occupants. For more information, check out the EPA’s Guide on Mold Cleanup.

Why Mold Removal Is Necessary

Mold grows in moist areas, such as basements, attics, or behind walls. If untreated, it can compromise the integrity of surfaces like drywall, wood, and carpet. Mold remediation reduces health risks, such as allergies and respiratory issues, and prevents further property damage by addressing the root causes, like excess moisture. Proper remediation also reduces the chances of mold regrowth and helps maintain a clean indoor environment.

Step-by-Step Guide to the Mold Remediation Process

While each mold remediation project may vary, these are the general steps involved in the process:

1. Inspection and Assessment

Mold remediation starts with a thorough inspection of the affected area. Professionals use tools such as moisture meters and thermal imaging cameras to locate mold and identify the sources of moisture. This assessment allows them to develop a targeted remediation plan.

2. Containment

Once mold is identified, the next step is to contain the affected area to prevent spores from spreading. Containment measures include sealing off doors and vents with plastic sheeting and creating negative air pressure within the space.

3. Air Filtration

Mold remediation specialists use HEPA air scrubbers and filters to remove mold spores from the air. HEPA filters capture microscopic mold spores, improving air quality and minimizing the risk of airborne spores spreading.

4. Mold Removal and Cleaning

With containment and filtration in place, mold removal can begin. Depending on the surface, remediation teams may use HEPA vacuuming, scrubbing, or damp wiping with specialized cleaning agents. Porous materials affected by mold may need to be removed and disposed of completely.

5. Disposal of Contaminated Materials

Mold-infested materials are carefully sealed in plastic bags to avoid contamination and then disposed of according to local environmental regulations. This ensures mold spores are not reintroduced into the environment.

6. Cleaning and Disinfection

Once contaminated materials are removed, remaining surfaces are cleaned and disinfected. Non-porous surfaces are scrubbed with detergent, while more extensive contamination may require antimicrobial treatments to prevent regrowth.

7. Drying and Dehumidification

Moisture control is essential in mold remediation. Dehumidifiers, fans, or heaters bring down moisture levels to a safe range. Professionals aim to keep humidity levels below 60% to prevent future mold growth.

8. Final Inspection and Testing

After remediation, a final inspection ensures the mold is completely removed and the area is dry. Professionals may use moisture meters or perform air quality tests to confirm that remediation was successful and that it’s safe for occupants to return.

Containment during mold remediation

Walsh Crawl Space: Our process includes expert inspection, containment, and detailed cleaning to ensure a complete solution to mold issues. Contact us for professional mold remediation today.

Key Points to Remember

Frequently Asked Questions About Mold Remediation

How long does mold remediation take?

The duration varies depending on the severity of mold growth and the area affected. Simple cases may take a few days, while more extensive issues could take a week or more.

Can I stay in my home during mold remediation?

It depends on the level of contamination and the containment setup. For extensive mold issues, temporary relocation is often recommended until the process is complete and the area is cleared for re-entry.

Schedule a Mold Assessment with Walsh Crawl Space
Facebook Instagram

cross linkedin facebook pinterest youtube rss twitter instagram facebook-blank rss-blank linkedin-blank pinterest youtube twitter instagram