By Walsh Crawl Space | Published on December 16, 2024
Proper irrigation and drainage are crucial for protecting your home's landscape and foundation. This guide delves into the differences between drains and swales and highlights how each method plays a vital role in managing water flow around your property.
Understanding the role of drains and swales helps maintain a balanced and functional outdoor environment.
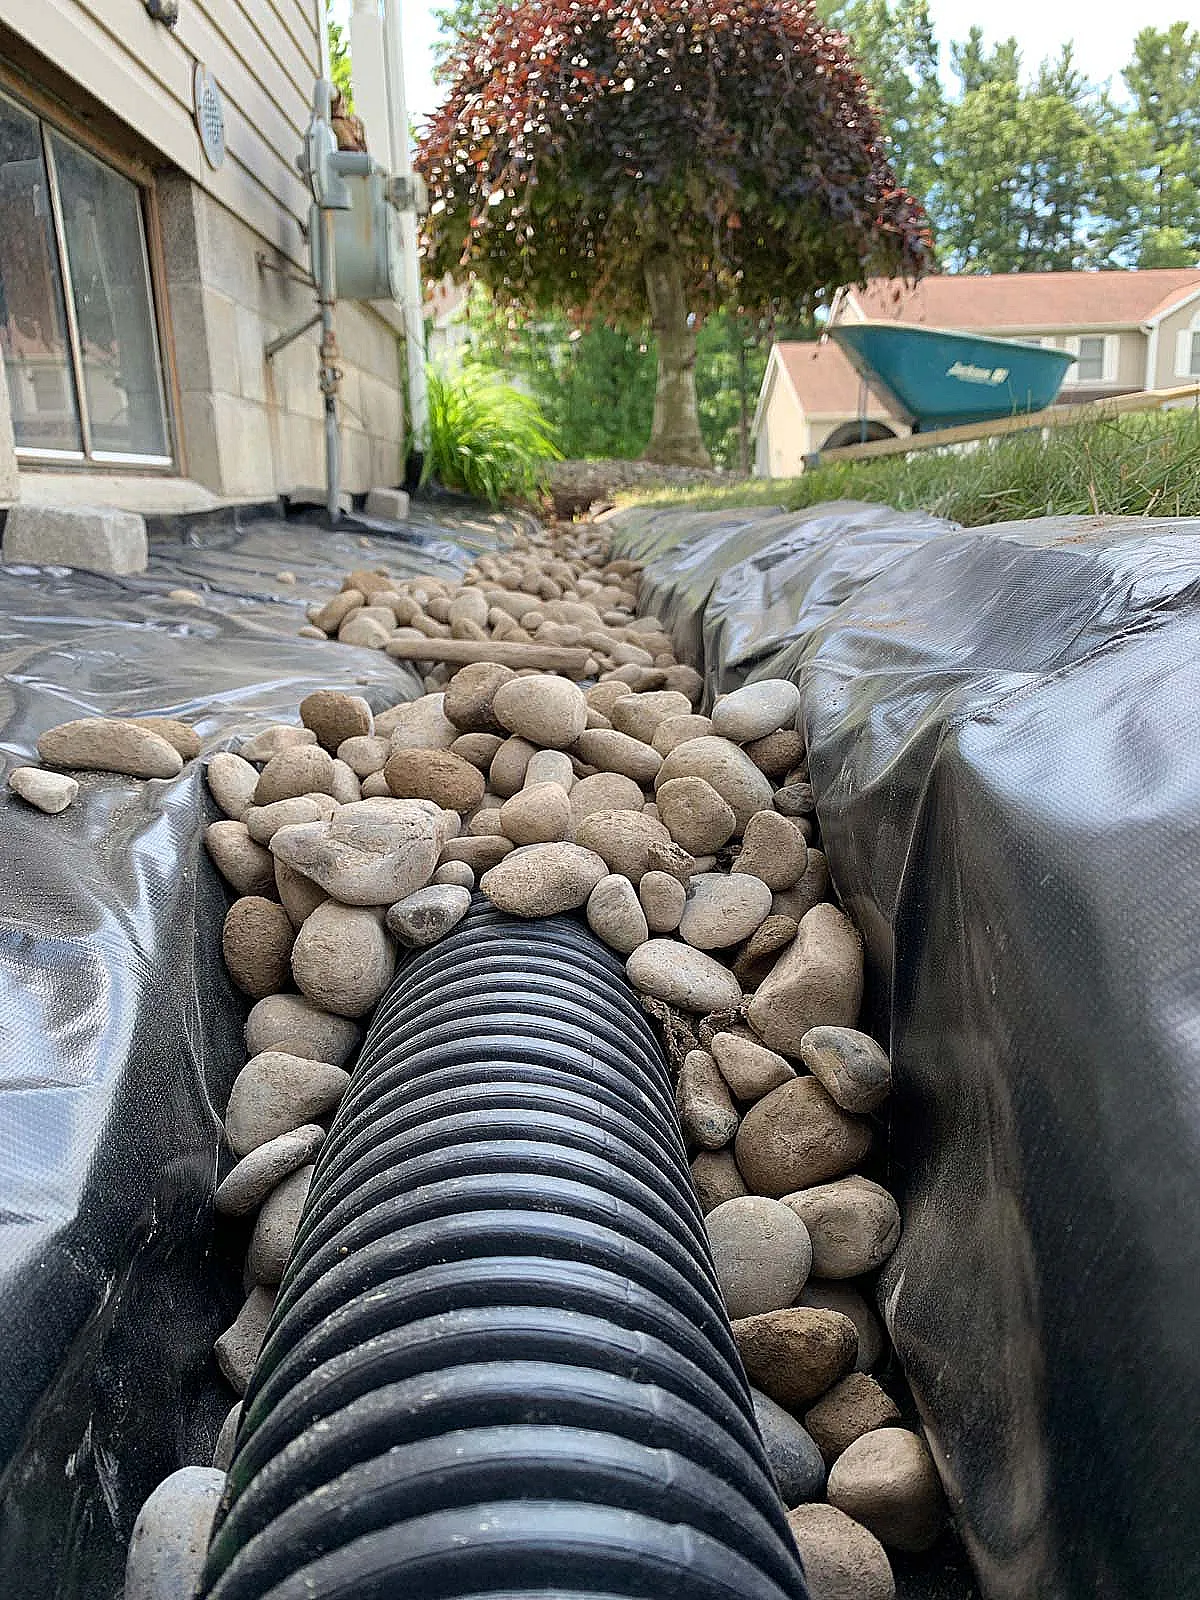
Drains are engineered systems designed to collect and redirect water away from areas where it could cause damage. These systems include options like French drains, channel drains, and surface grates. They are particularly effective in areas prone to water pooling or where rapid drainage is essential to prevent waterlogging.
For example, a French drain is a trench filled with gravel and a perforated pipe, which redirects water away from your home’s foundation. Channel drains, often seen in driveways or patios, are surface-level systems that catch runoff and direct it to a safe discharge point.
Swales, on the other hand, are shallow, vegetated ditches designed to slow down and redirect surface water naturally. Unlike drains, swales leverage the landscape's contours and rely on vegetation to help with water absorption and filtration. They’re ideal for eco-friendly drainage solutions, as they help recharge groundwater while reducing erosion.
Swales are often used in larger properties or areas where natural aesthetics and sustainability are priorities. A well-designed swale can also complement your garden, acting as a functional yet attractive landscaping feature.
Choosing between drains and swales depends on your property’s needs. Drains are better suited for urban areas with limited space and heavy runoff concerns. They are also ideal for paved surfaces and areas prone to flooding. Swales, in contrast, are excellent for larger properties with gentle slopes, where water can be redirected over a broader area without risk to structures.
In some cases, a combination of both systems offers the best solution. For instance, a swale can manage general water flow across your property, while a French drain can protect specific problem areas like your home’s foundation.
Walsh Crawl Space: From drainage solutions to landscaping advice, our team ensures your property stays dry and safe. Contact us today to discuss your drainage and irrigation needs.
Drains, especially French and channel drains, often involve higher material and installation costs. Swales are typically less expensive, relying on grading and vegetation rather than complex hardware.
Yes, but the design may need to be modified to fit the available space. A professional assessment is recommended to ensure proper water flow without risking erosion.
Drainage systems should be inspected annually to check for clogs, damage, or erosion. Swales may require occasional regrading or vegetation replenishment to maintain functionality.


By Walsh Crawl Space | Published on December 2, 2024
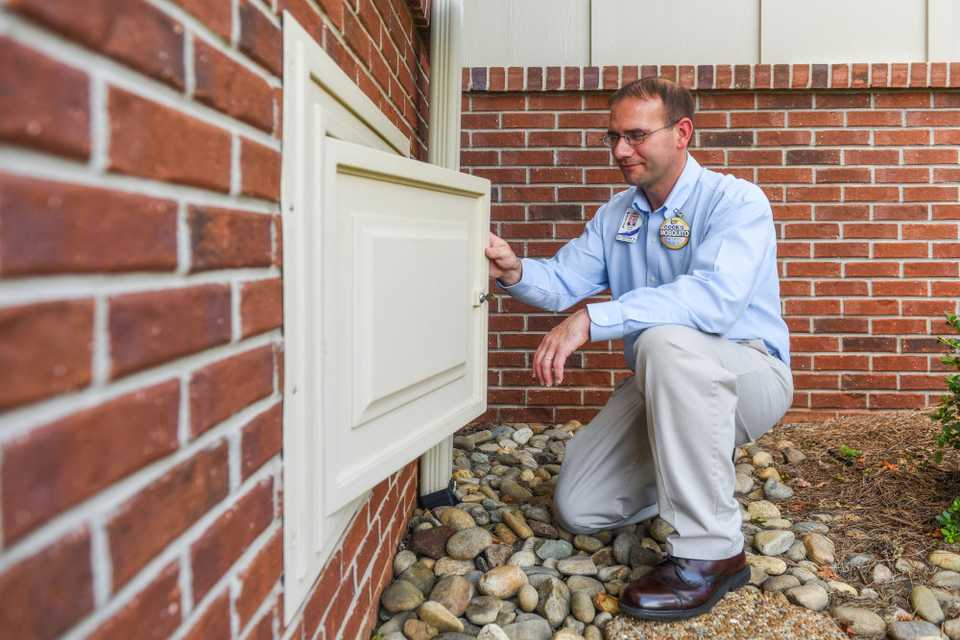
Crawl spaces can develop numerous issues if left unchecked, including moisture buildup, mold growth, pest infestations, and structural damage. In this guide, we’ll explore common crawl space problems and the best solutions to keep your home safe and dry.
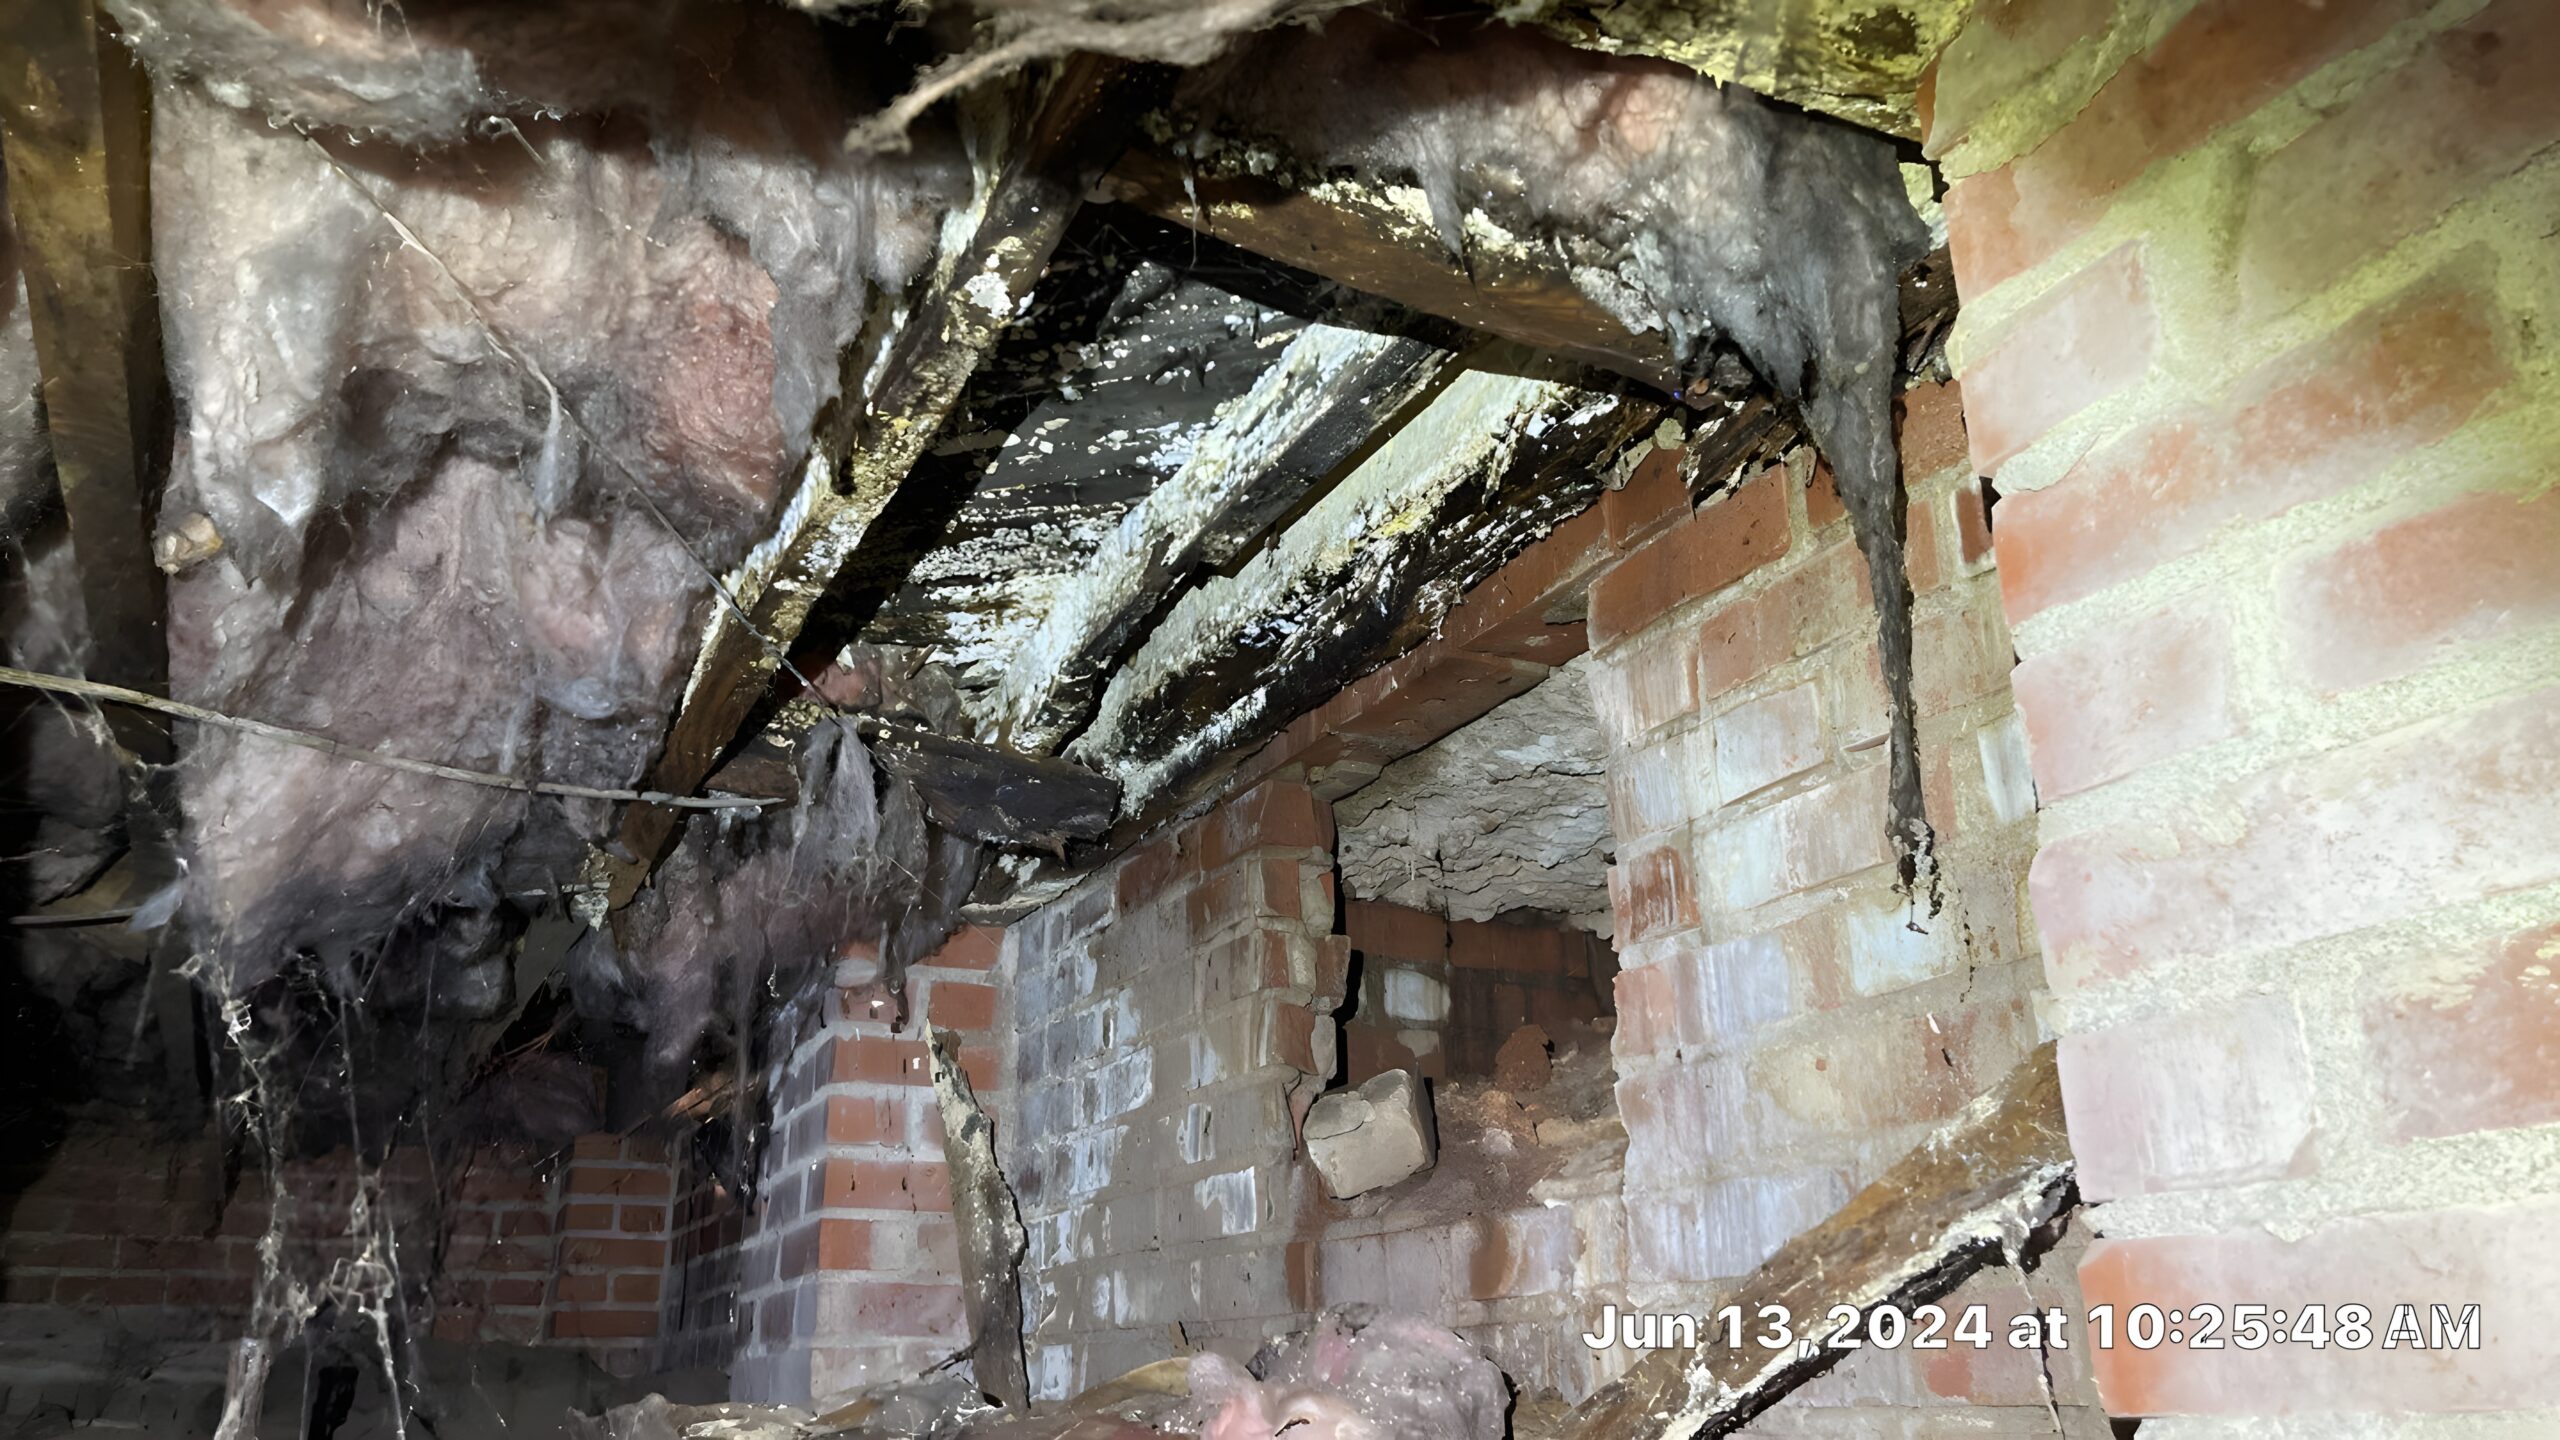
Addressing crawl space issues early is essential to protect your home’s foundation and indoor air quality.
Encapsulation: Installing a vapor barrier is one of the most effective ways to control moisture and protect your crawl space. Encapsulation also improves energy efficiency and reduces humidity levels.
Drainage Systems: A perimeter drainage system prevents water from pooling around your foundation, keeping the crawl space dry.
Dehumidifiers: Installing a high-capacity dehumidifier helps maintain a balanced humidity level, preventing mold and mildew growth.
Insulation: Adding crawl space insulation improves energy efficiency and prevents cold air from seeping into your home.
Walsh Crawl Space: From crawl space encapsulation to drainage solutions, Walsh Crawl Space provides comprehensive repair and maintenance services. Contact us today for a free consultation.
Moisture promotes mold growth, wood rot, and attracts pests, all of which can compromise your home’s structural integrity and indoor air quality.
Encapsulation involves sealing the crawl space with a durable vapor barrier to prevent moisture intrusion and improve energy efficiency.
It’s recommended to inspect crawl spaces at least once a year to address potential issues like moisture, pests, or structural damage early.
By Walsh Crawl Space | Published on November 19, 2024
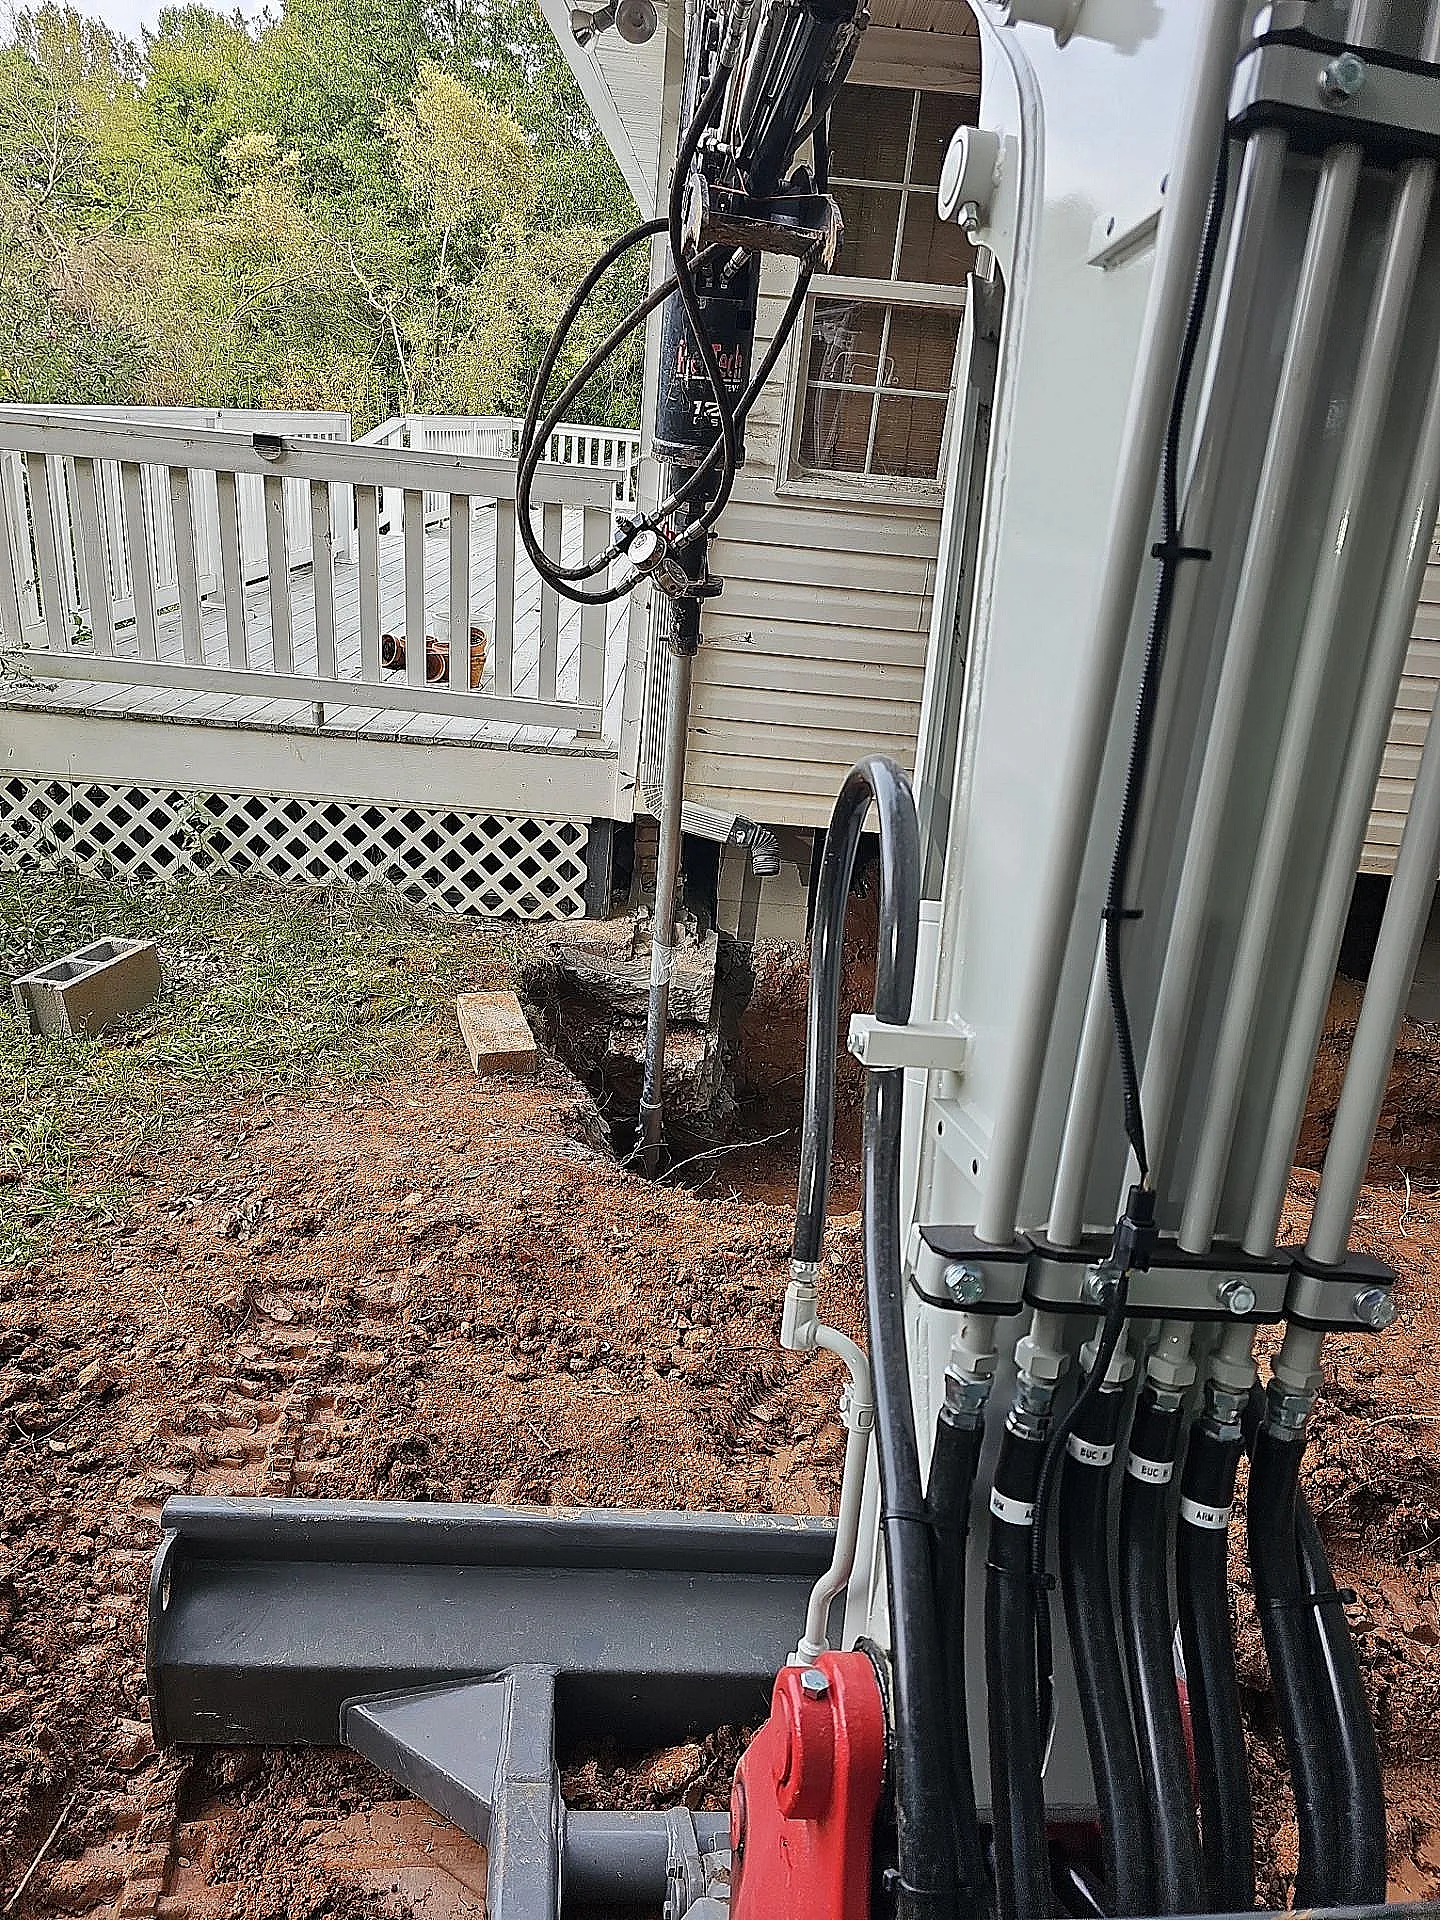
Helical piers, also known as screw piles, provide an effective and long-lasting solution for stabilizing foundations and preventing structural damage. This guide explores how helical piers work, their benefits, and why they’re ideal for homes experiencing settlement or uneven foundations.
Helical piers offer a dependable solution for stabilizing homes with sinking or uneven foundations.
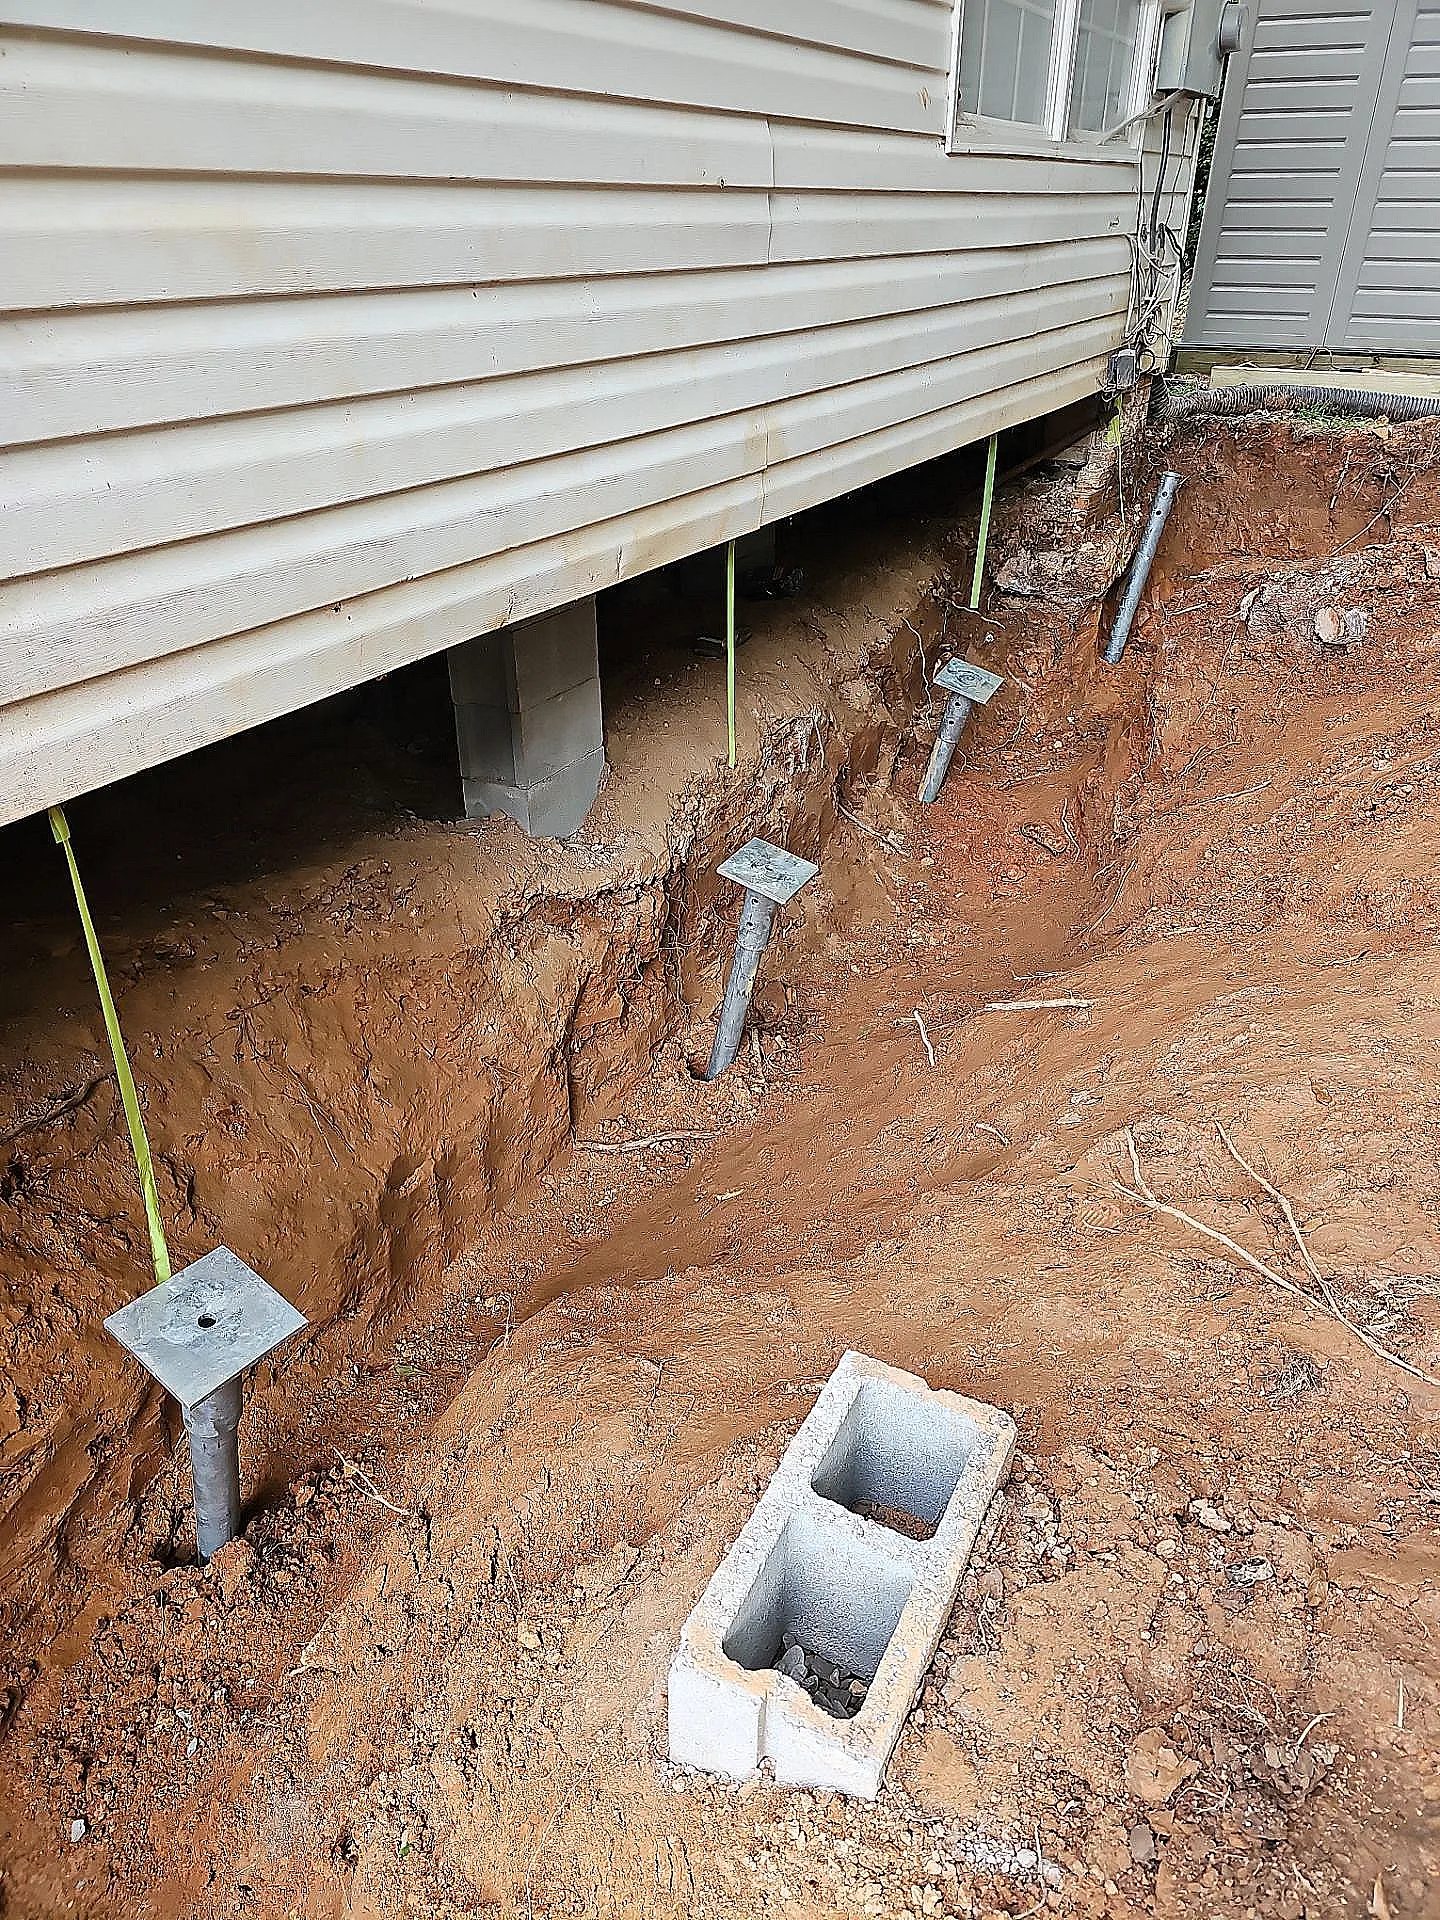
Helical piers are steel foundation supports that are screwed into the ground to stabilize or lift foundations affected by soil movement or settlement. They consist of a shaft with helical plates, which allow the pier to anchor deeply into stable soil layers. By redistributing the load of the structure, helical piers provide lasting support for foundations, preventing further movement and damage.
If your home exhibits signs of foundation settlement—such as cracks in walls, sticking doors, or uneven floors—helical piers might be the ideal solution. These piers are designed to counteract poor soil conditions that can no longer support the weight of the structure. Whether your home is built on expansive clay, poorly compacted fill, or in areas with high water tables, helical piers can offer the stabilization and lifting required to restore the foundation’s integrity.
The installation process involves driving the piers into the ground until they reach stable soil strata or bedrock. The helical plates on the shaft ensure a secure hold, allowing the piers to transfer the building’s weight to more reliable soil. Helical piers are a minimally invasive solution and can be installed in limited access areas, making them versatile and efficient for various foundation repair projects.
Foundation experts begin by evaluating the soil conditions and identifying the areas requiring reinforcement. This step ensures the appropriate placement and number of helical piers for optimal stabilization.
Using hydraulic equipment, the helical piers are screwed into the ground to the required depth, bypassing weak or unstable soil layers. Each pier’s torque is monitored to confirm adequate load-bearing capacity.
Once the piers are in place, brackets are attached to the foundation to secure it to the piers. This connection ensures even weight distribution and prevents further settlement.
The final step involves lifting the foundation, if necessary, to its original position. The home is then permanently stabilized, protecting it from future settlement issues.
Walsh Crawl Space: We specialize in helical pier installation and foundation repair. Let our experts restore your home’s stability. Contact us for a consultation today.
Helical piers can be used in most homes experiencing foundation settlement or instability. However, a professional assessment is necessary to determine their suitability based on your soil and structural conditions.
Installation is typically completed in a few days, depending on the project’s size and complexity. The minimally invasive process ensures minimal disruption to your property.
Yes, helical piers are an excellent choice for new construction projects in areas with challenging soil conditions. They provide a stable foundation from the start, preventing future settlement issues.
By Walsh Crawl Space | Published on November 7, 2024
Perimeter drain systems play a critical role in preventing water intrusion and managing moisture around your home’s foundation. This guide explains what a perimeter drain system is, how it works, and why it’s essential for any property owner concerned about foundation and water-related damage.
Proper installation of a perimeter drain system can help prevent costly water damage to your home.
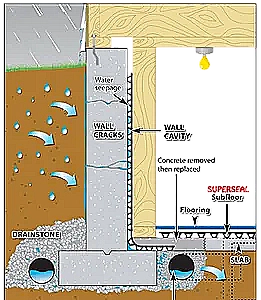
A perimeter drain system, also known as a French drain or foundation drain, is designed to channel groundwater away from your home’s foundation. By redirecting water away from vulnerable areas, these systems protect basements and crawl spaces from water infiltration, which can lead to structural damage and mold growth. A well-installed perimeter drain system collects water around the perimeter of the building and directs it to a sump pump or a safe drainage location.
Without proper drainage, water can accumulate around the foundation, leading to cracks, leaks, and compromised structural integrity. Perimeter drains help mitigate these risks by keeping water away from the foundation walls. They are particularly crucial for homes built in areas with high water tables or heavy rainfall. In addition to structural benefits, perimeter drain systems can help maintain a dry, healthy environment within crawl spaces and basements, reducing the risk of mold, mildew, and pests.
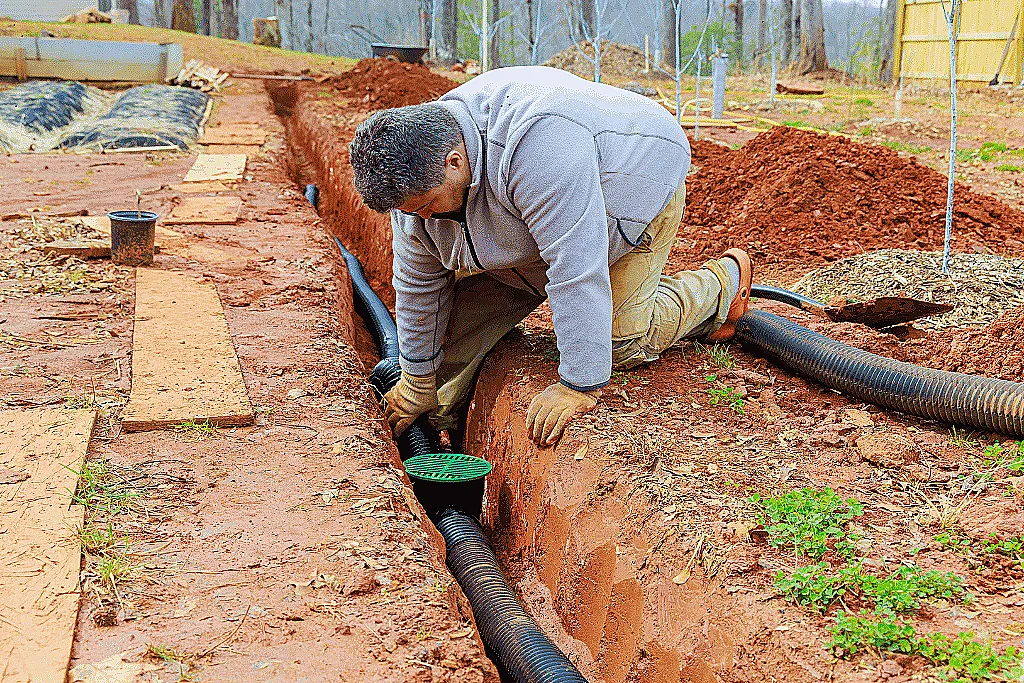
Perimeter drain systems are typically installed at the base of the foundation. A trench is dug around the foundation walls, where a perforated drain pipe is placed and surrounded by gravel. This setup allows water to seep into the pipe through perforations, directing it away from the foundation. Some systems lead to a sump pump basin, where the water is then pumped away from the home. The gravel acts as a filter, preventing soil from clogging the pipe while allowing water to flow freely.
In the first step, professionals dig a trench around the foundation. The depth of this trench is carefully calculated based on the home’s foundation level and the local water table.
A perforated pipe is then laid in the trench, sloping slightly to ensure water flows in the right direction. The pipe is positioned to collect groundwater efficiently while avoiding areas that could lead to clogging.
After placing the pipe, contractors fill the trench with gravel to support drainage while filtering out soil particles. The gravel layer is essential to maintain clear pathways for water to enter the drainage system.
In many installations, perimeter drain systems are connected to a sump pump, which actively moves water away from the home’s foundation. The sump pump acts as a secondary line of defense against water intrusion.

Walsh Crawl Space: With proper perimeter drain installation and maintenance services, Walsh Crawl Space helps keep your foundation safe from water damage. Contact us for a professional assessment today.
It’s recommended to inspect your perimeter drain system at least once a year, especially before the rainy season, to ensure it's functioning properly and to clear any clogs or blockages.
Yes, a properly installed perimeter drain system is effective in preventing basement flooding by redirecting groundwater away from your home’s foundation.
Most homes benefit from perimeter drains, especially if they have basements or are located in areas prone to heavy rainfall or high water tables. However, installation should be customized based on the property’s specific needs.